

How To Make Planner Pages In Microsoft Word
Phone call me a dinosaur if you will, but when I'k plotting out a busy week I like to accept it there in front of me on a piece of paper. Reckoner calendars and to-do lists have their place, but if I need to just look down and work out what to do adjacent, you tin't beat a weekly planner on a bit of A4.
It seems I'm far from alone. If you lot search for "weekly planner" on Google, y'all'll discover an entire cottage industry of people selling PDF templates for weekly planners for £10 or £xx a popular. Just for the template, not a newspaper pad full of them!
Equally neatly formatted as some of these planners are, they're unlikely to meet your precise needs and it's not that difficult to make your own. Here, I'yard going to prove you how you lot tin use Microsoft Word to create a weekly planner, that will accept all the fields you need and won't require you to whip out your credit bill of fare.
Weekly planner – setting upwardly the page
The first thing to decide is which orientation you desire the planner to adopt. If you're creating a weekly planner, it makes nearly sense to have the days of the week running forth the acme of the page and the to-do items below, in my opinion. That means the landscape format makes most sense.
To set upwards your page in landscape format, open a new document in Word, then click on the Layout tab followed by Orientation and select Landscape.

You should see the page below flip. Use the zoom controls in the bottom-correct corner of the screen to ostend the page is flipped on its side.
Add a header
Now y'all'll probably want to give your planner a header, or even but a field where you tin can enter which week you lot're planning. Don't make this as well large, because you don't desire to waste product space for the planner itself.
Choose a font (aught as well fancy would exist my advice) and enter your header into the meridian of the page, making sure information technology'south centred by clicking on the icon shown below:

If you want to create a field where you can handwrite the "week commencing", for case, create a line by repeatedly pressing the underscore key on your keyboard, which is found by pressing SHIFT and the key next to the null on your keyboard, with ii lines on it.

Create a table
At present we desire to create a table into which we tin enter the days of the calendar week and the things we have to do in them. I'thou eventually going to suspension my tabular array into ii parts, with deadlines and to-dos for each twenty-four hours, merely to start with I'm going to create i giant table, which I'll split after.
You need to decide how many rows and columns you want in your table. This can be contradistinct later on, but it'south meliorate to get it as correct as you can now. I'm going to take seven columns in my table – i for each of the weekdays, a weekend slot and one for the tabular array headers. I'm going to add together 15 rows into the table for entering deadlines/to-dos, although I'll fiddle with this layout subsequently.
To put the table in your planner, printing Enter a couple of times to leave some articulate space between your header and click the Insert tab in the top menu, then Table. Click Insert Table again in the drop-down card and so that you can manually enter the number of rows and columns you require.

Yous should exist left with a page looking something like this:

Filling the table
Now we want to kickoff filling the table. Across the meridian nosotros enter the days of the week, and downward the sides we enter headers for the deadlines and the tasks. To make those weekdays and headers stand out from the page, nosotros can shade the background of those cells using the fill up bucket tool, which yous'll find nether the Dwelling tab. Employ a calorie-free grey, as there'south no point in wasting expensive colour ink when you lot come to print this affair out.

You lot might also want to give the days of calendar week row a fleck more depth to help emphasise it's a header. To practise that, only hover the mouse on the line below one of the weekdays until the cursor turns into 2 up/down arrows, and then just click and drag the line downwards to the desired depth. Y'all should end upwardly with a page looking something like this:

Finessing the design
Now nosotros motion into the stage of adding the finishing touches, making the weekly planner look nicer. Allow's commencement by putting a little animate space betwixt the Deadlines and To-Do sections. Click in the cell containing the 'To-Practise' header, at present click on the bluish Layout tab that should appear at the far right of Word'south summit (or Ribbon) bill of fare. Don't get confused with the main Layout tab, which is in blackness and in the middle of the menu.
Now click Split Tabular array and a little gap should appear betwixt your sections, as below:

Next, permit's go rid of all those unnecessary lines in the Deadlines and To-Do header sections. Click on the cell containing the Deadlines heading and and so, with the mouse button held down, elevate it down until you've selected all iv of the grey boxes in that department. And so, back under that bluish Layout card, select Merge Cells. Do the same for To-Do below, and you should terminate up with a table looking like this:

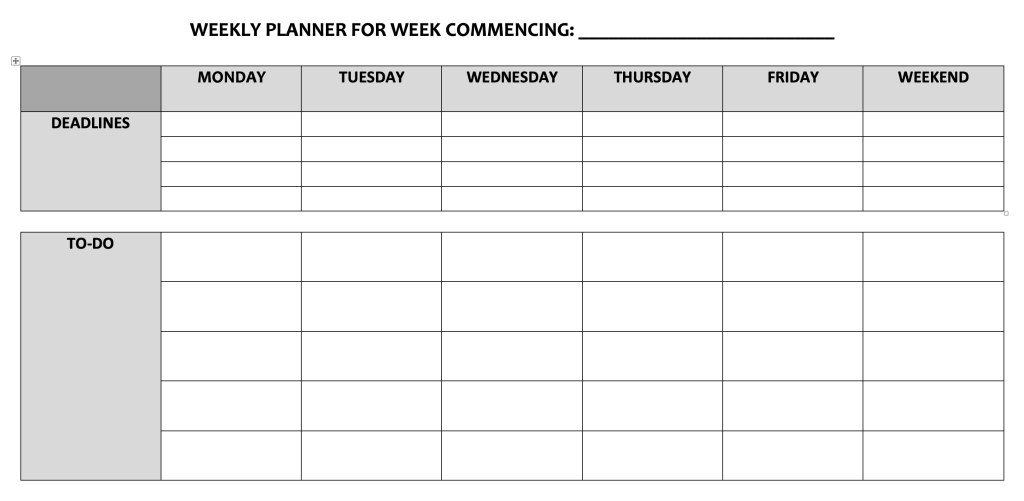
Because my to-practice tasks often need a bit more space than my deadlines, I've also decided to merge cells in that section, and then that each to-do has a little more room to breathe, leaving me with a terminal planner that looks like this:
The terminal job is to save your planner, so that you tin print it off at the start of every working week. You can save the file as an ordinary Word medico or as a Word template, in case you want to utilise it as the basis for other planners with slightly different designs.
If you lot want to start from the template shown above, or just use the planner I've created, you can download my weekly planner template here – I won't even accuse you lot £20 for the pleasure.
Hopefully, you can meet how by using the tools described above, you lot could continue tailoring sheets to your ain needs. In the case below, for case, I've replaced the weekend column with a 'telephone call sheet' of people I need to telephone call back.

One terminal tip: if you want to practise something similar this, with a separated column in the table, the dissever table characteristic won't work. This curt video hither volition show you how to split a table vertically, but it basically involves moving cells from the commencement table and so dragging them dorsum into place, effectively creating a carve up tabular array.
At present READ THIS: How do I remove dots between words in Discussion?

How To Make Planner Pages In Microsoft Word,
Source: https://bigtechquestion.com/2021/01/25/software/design-a-weekly-planner-in-word/
Posted by: yeearoult.blogspot.com
0 Response to "How To Make Planner Pages In Microsoft Word"
Post a Comment